|
|
|
|
This screen can be used to maintain several attributes about individual time periods (once they have been created). The Time Period Setup screen is used to define the various types of time periods that will be used in your system. This screen allows you to view a few details about the specific time period instances once they have been created.
For example, you can use this screen to allow end user adjustments for a particular time period and disable that ability for another.
This screen is available to users having the Administrator and P&R Administrator role.
This screen is available with the Project Time, Project Tracking and Project Portfolio family of Unanet licenses.
Topics covered on this help page include:
Searching for Time Periods (to refine the list of time period instances)
Listing Time Periods (to further manage each time period)
Custom Time Periods (to create custom sized time periods, e.g. for year end or quarterly boundary cut-offs)
You may also be interested in:
Time Period Setup (for more information about establishing the time period definitions)
FAQ - Why are my approvers missing the Approve buttons when viewing timesheets in their approval queue? (search for this topic in the Knowledge Center)
FAQ - What is a typical 9/80 work week? (search for this topic in the Knowledge Center)
Quick Topic - Creating Custom Time Periods For Stub Periods (search for this topic in the Knowledge Center)
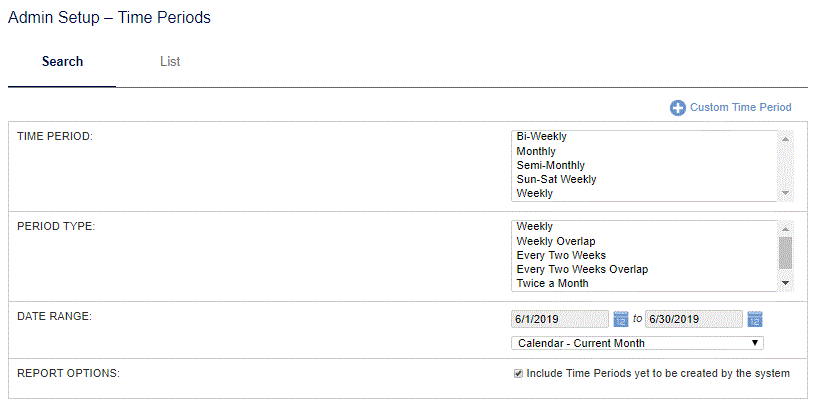
Using the Time Period Search / List screen, you can choose to either display a complete list of all existing time periods (by simply clicking on the List tab), or you can supply selection criteria on the Search tab to narrow down the results, and then click on the List tab to display the filtered list.
An example Search / List screen follows:

The "Include Option to Complete All Pending Approvals" feature can be enabled via the Enable Administrator Bulk Approval (unatime.admin_bulk_approve.enable) property.
The "+ Custom Time Period" option can be enabled via the Allow Custom Time Periods (unatime.allow_custom_time_periods) property.
|
|
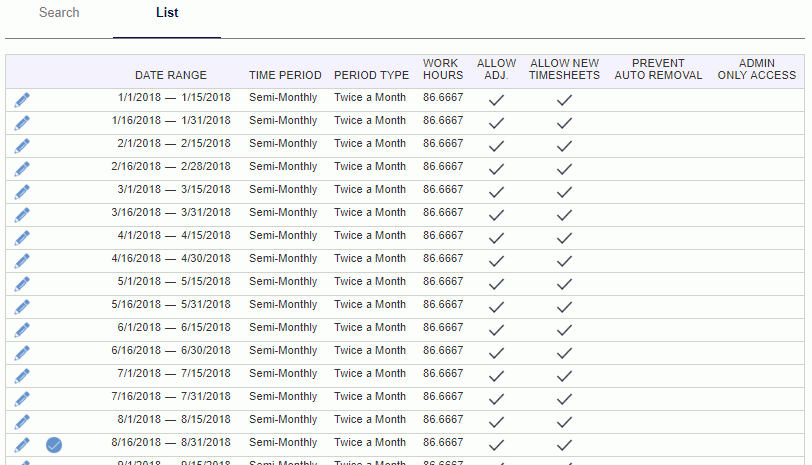
The filtered (or complete) list of time periods will resemble the following example:

|
|
|
Using the Allow Custom Time Periods (unatime.allow_custom_time_periods) property, this screen can also be used to create "custom time periods". When this property is enabled, a new ![]() link will appear on the screen.
link will appear on the screen.
This feature may be useful if, for example, you desire to:
So long as you pre-define these custom time periods prior to users creating timesheets in those periods you can configure as many custom sized time periods as you like. Using this mechanism, you could pre-create any shortened or lengthened time periods ahead of schedule such that when your users attempt to create a timesheet for dates intersecting your special time periods, they will use your custom time period definition.
New Time Period Creation
When a user creates a new timesheet, the system will look to see if there a time period has already been created or if this is the first timesheet being created for a time period it will first setup of the time period entity. Under normal circumstances, should the system find that this is the first timesheet for a time period, it will first define the time period entry using the standard definition for that particular type of time period (as defined on the Time Period Setup screen). Should a user attempt to create a new timesheet and the system finds that a custom time period has been defined for the date they supplied, the system will use the custom definition (rather than attempting to create a standard time period for that time frame).
Avoiding Gaps
When creating custom time periods, the system will attempt to ensure that the creation of custom time periods does not leave any dates that would not fall within a standard time period which are not associated with a defined time period. These partial periods will be displayed in red text on this screen alerting the administrator that they have left a "gap" that must be addressed in order for users to create timesheet entries for those dates. For example, if you were to attempt to split the final week of the year in order to end the year on 12/31, you could do so by creating a shortened time period for the first half of the week which ended on 12/31. If you did nothing further, this screen would display a phantom entry in red text on this screen for the period of time 1/1 to the next normal time period boundary (ie the 2nd half of the normal time period that was not covered by your shortened time period). The system will not automatically attempt to fill in the 'gap' with a shortened time period, but rather will require that the Administrator complete the custom time period definitions such that no gaps remain. Should the administrator fail to create the custom time period for the second half of the week in this example, users would receive an error message when attempting to create a timesheet for 1/1.
Year End Example Scenario
Suppose you have a weekly time period that runs from Sunday to Saturday and Dec 31st falls on a Thursday for the current year. Should you have a need to split the final time period such that it ends on Thursday, Dec 31st for example, you could use the custom time period feature to help with that need.
Do note that when you create a “shortened” time period you’ll need to decide what you want to do with the leftover days? That is, do you want to have the first period of the next calendar year be a “mini-period” that spans just a few days such that it ends on your normal weekly time period boundary (in this case - Friday, Jan 1 to Saturday, Jan 2). If you go this route, one drawback is that you have an entire submittal / approval process just for a small timesheet. Another alternative is to create an expanded week for the first week of January (that is, instead of beginning that time period on Sunday, Jan 3rd, you could create a custom time period that began on Friday, January 1st -- that ran through Sat, Jan 9th (an 8 day timesheet).
This is all possible using the “add custom time period” feature.
Custom Time Periods and Dilution
Note that if you have dilution enabled, when you do create any shortened or lengthened time periods, you’ll want to be sure to supply an appropriate “Work Hours” value on those custom time periods. For example, the “Work Hours” value for your normal weekly time periods is likely 40. This is the value that is used in the dilution calculations. If you have a custom shorter or longer period – you may need to adjust the “Work Hours” value on those two custom time periods to accommodate the additional (or missing) time that will be applied to that timesheet such that your dilution calculations work on an appropriate basis. In the example above, you might have 32 hours for the shorter week – and 48 for the longer week.
Set custom periods up early
Should you plan to use custom time periods, be sure to set them up sufficiently ahead of time. If you have users that have created time entries for the period that overlaps your desired custom time period, a standard time period will have already been created for those dates, thus preventing you from further modifying the definition of those custom periods. Should that occur, you would need to first remove those timesheets such that you could remove those time periods and then create for custom time periods. For this reason, it is important to set up custom time periods sufficiently early so that when your users do begin to enter time for those dates, the custom period is already in place.
Currently, this feature is not available for use with "Overlap" type of time periods.