|
|
|
|
For users interested in entering time via a mobile device (iOS or Android), Unanet has a mobile app available in the App Store or Play Store called Unanet. You can add, update, delete, and submit timesheet entries and leave requests.
Note: For iOS, the mobile app requires the iOS 12.0 operating system, at a minimum.
Note: For Android, the mobile app requires the Android 8.0 operating system, at a minimum.
The mobile app is available to users having a login ID to the app, but only users having the Timesheet User role can access the functionality (adding timesheets/leave requests, submitting, etc.).
This app is available with the following licenses: Project Time, Project Tracking, Project Portfolio, and Project Financials family of licenses.
Topics covered on this help page include:
You may also be interested in:
Working with Timesheets for more information about how timesheets are handled in Unanet
You must input your company domain name to get started. The domain name can be located by checking the URL for your Unanet web application. It is the text that appears before the first dot (e.g., company.unanet.biz/action/home).
Note: If you log in on one device, and then log in on a second device, you will be logged out of the first device.
If you enter an invalid password too many times, your account may be locked based on the value in the Failed Login Attempts Before Lockout (0 = Unlimited) (unanet.login_attempts_before_locked) property.
If the Enable Password Reset (unanet.password_reset.enabled) property is enabled, you can tap Forgot Password to reset your password. You will receive an email with a link for resetting the password. You will have 48 hours to use this link. After that, you will need to request a new reset link.
You can set up your company logo for the mobile app by having your Unanet administrator upload the image via Admin >> Setup Images. Simply follow these steps:
Single sign-on (SSO) is an authentication method that enables users to securely authenticate with multiple applications and websites by using just one set of credentials. There are several methods for implementing SSO. Unanet supports Security Assertion Markup Language (SAML) for our web applications. SAML is not well suited for mobile applications and as such Unanet supports Open ID Connect (OIDC), which is another SSO protocol built upon the Oauth 2.0 standard. All major Identify Providers such as Okta already support the OIDC protocol and Oauth 2.0 standard. Unanet supports Okta for the Unanet mobile app.
There is a small amount of work to ensure that security certificates are properly exchanged. The Unanet Customer Support team will be ready to work with your IT team to get Okta setup for the Unanet mobile app.
If SSO is enabled on your domain and your team has created a new Okta application for Unanet mobile, when you enter your domain on the first login step, the Unanet mobile app will see that the domain requires an SSO login. The app will redirect you to your multi-factor authentication provider (typically Okta Verify or Microsoft Authenticator) to authenticate with using your company credentials, and then you will be redirected to Unanet Mobile and automatically logged in.
Additionally, if you enable biometrics, such as TouchID or FaceID, the next time you login, you will not need to authenticate using SSO. The device will simply use your fingerprint or face to log you in automatically.
After your first login, you will be prompted to allow biometric authentication if your device supports biometrics and you have enabled biometrics in the app (navigate to More>>Account Settings>>Security and enable Biometrics Authentication). If you choose to allow biometric authentication, then you can log in using Face ID or Touch ID (iOS only), or fingerprint (Android only). You can also disable biometrics if you choose to go back to username/password.
This screen may be used to display graphs of hours logged by day for the current time period. You can tap View Current Timesheet or Add Current Timesheet to quickly navigate to your current timesheet. You can also tap Jump to Today to quickly navigate to today’s details.
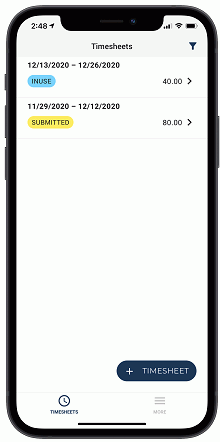
Sample iOS timesheets screen
Swipe down to refresh the list of timesheets. Tap on a timesheet to see the time slips, and tap on a day to see the details. You can tap on the filter icon in the upper right corner of the screen to filter on status and time frame.
In order to create a timesheet, the following must be true:
Click on +Timesheet to add a timesheet. You can add a timesheet for the next period, or choose a specific date. If you already have a timesheet for that date, that timesheet will display. Then you can tap on +Hours to add your hours.
You can edit timesheets that meet the following criteria:
When editing a time slip's drop-down values (i.e., project, task, etc.), you will have the option of editing only that day or every day in the timesheet.
Swipe left on a timesheet or time slip to delete it. If deleting a time slip, you will have the option of deleting for only that day or every day in the timesheet.
You can delete a timesheet under the following conditions:
for timesheets in INUSE, DISAPPROVED, or any ADJUSTMENTS status:
for timesheets in INUSE or DISAPPROVED (not Adjustments):
Note: If this property is set to true, the timesheet will not be deleted, but the time will be zeroed out.
For Adjustment statuses, the adjustments are deleted, but the original timesheet is left in LOCKED or EXTRACTED status.
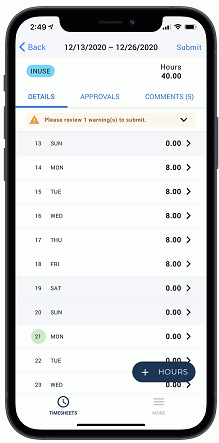
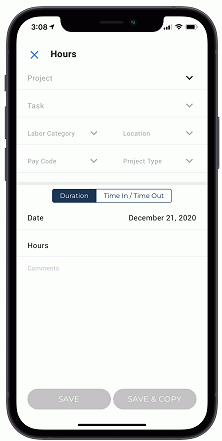
Sample iOS timesheet details screen Sample iOS hours screen
Tap on +Hours to add your hours. You must first select a project before allowed to enter time. You can add hours for a Duration of a single day or multiple days, or add hours for Time In/Time Out (TITO) punches (only available for non-subcontractor portal users).
For Duration, you can tap on the Date field and select multiple days for which to enter hours.
For TITO, you can tap Add Punch to add hours, and tap Remove Punch to remove those hours. Only one TITO entry at a time can exist without a stop time. If you already have a punch without an end time, and you enter another without an end time, the end time will auto-populate to the current time. The project or user can require TITO time entry. See Time In - Out for more information.
Hours are rounded according to the user's time entry increment (see People Profile >> Time), and must be zero or positive.
When adding hours, you can search for projects, tasks, labor categories, locations, project types, and pay codes. To narrow selections, start typing in the search field for each detail. These fields are available under the following conditions:
Note: We recommend choosing from the recently used projects and tasks when possible.
The combination of these fields must be unique: work date, project, task, labor category, location, project type, and pay code. See Working with Timesheets >> Time Field Descriptions for more information about the timesheet fields.
If Hide Comments on Timesheet Edit (unatime.timesheet.hide.comments) property is false, you can enter comments for time entered. If the project for the timesheet requires comments, then you must supply comments for time entered. You can also tap the dictation icon on your phone to speak your comments.
If you change a timesheet and Enable Timesheet Audit Trail (unatime.audit) property is true, you will be prompted for a change reason. You can select a change reason for each change, or select a global change reason for all of your changes. See Working with Timesheets >> Audit Trail for information about tracking timesheet changes.
After entering your information, you can Save or Save & Copy. The latter option will save the timesheet and copy the details (project, task, etc.) to the next day in the timesheet. Hours and comments are not copied. The save actions will be disabled until the timeslip becomes unique (as you select the data).
When you are ready to submit a timesheet, tap on  in the upper right corner to submit. You can also add a comment when submitting. If you made timesheet adjustments, you will be prompted to enter an adjustment change reason.
The mobile timesheets follow the same validations as the main Unanet web application, including custom business rules (stored procedures).
If you have warning messages (e.g., a day with more than 24 hours), you can choose to cancel your submission or continue your submission. If you have error messages, you cannot submit until the errors are corrected.
if comments are required for timesheet cells, the colored borders indicate the following:
black border - comments have been entered
yellow - warning, no comments but not required
red - error, no comments and they are required
In order to see the approval history for a timesheet, tap to open the timesheet from the list. Tap the Approvals tab. You will see a listing of the approval history (date/time, approver name).
In order to see the comments for each time slip, tap to open the timesheet from the list. Tap the Comments tab. You will see a listing of the comments for each timesheet cell.
If the Enable Timesheet Audit Trail (unatime.audit) property is true, you can view the audit history of changes. You will see a listing of each changes work date, project/task, modified date, original values, new values, and change reasons.
This tab will display if you have adjustments and the timesheet is in LOCKED, EXTRACTED, or one of the ADJUSTMENT statuses. You can view the modified date, the change from and to values, and the reason. A yellow bar on the left side of the screen indicates pending adjustments.
Tap on More to access the following features.
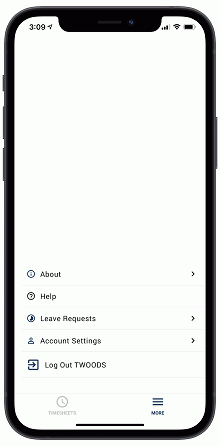
Sample iOS More screen
Tap to see the app version, platform version, and current platform URL. You can also see Unanet's Privacy Policy and Terms and Conditions.
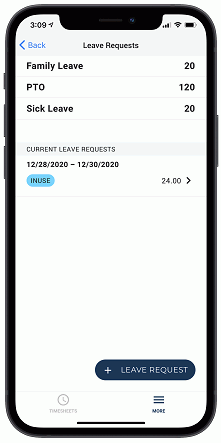
Sample iOS Leave Requests screen
If you have leave requests and Enable Leave Request (unatime.leave_request.enabled) property is true, you will see your leave balances at the top of the screen and then a list of current leave requests (i.e., requests whose end dates are greater than today). You can edit or delete requests that are in INUSE or DISAPPROVED status (if request is in SUBMITTED, APPROVING, or COMPLETED status when you try to edit, you will see a warning that the request will go through the approval process again if you proceed). You can also cancel requests that are in SUBMITTED, APPROVING, COMPLETED, or LOCKED status. Swipe left to delete or cancel. If notifications are enabled, the manager will be notified of the delete or cancellation.
Tap + Leave Request to add a request. You can select start and end dates, enter hours, select whether to include non-working days, and enter a comment. The default number of hours between start and end dates is based on the user's business week definition, but you can override the number of hours. Tap Save or Submit when finished.
You will also see a section at the top for remaining balances. It will show the remaining leave balance for each leave project to which you have access. You can tap View Details which will show all the past requests that contributed to the remaining balance.
In this section, you can do the following:
Timesheet Users can toggle Autofill Timesheet on or off. This will autofill values from the previous timesheet, i.e., you can tap on a "ghost" time slip entry and the add hours form is pre-populated with project, task, etc. (hours and comments are not pre-populated). The "ghost" time slip is only visible if there is not already a matching entry for that row on the selected day. Note that "ghost" entries from the current timesheet always display (this toggle only affects displaying values from previous timesheet).
In this section, you can do the following:
tap Change Password to enter a new password.
In this section, Timesheet Users can do the following:
tap Allow Mobile Notifications to turn notifications on. Notifications must be turned on in order to get timesheet reminders. Once you have turned notifications on, the button will be grayed out. You can disable notifications using your phone system notifications. Note that you cannot enable notifications if it is disabled at the system level.
tap Timesheet Reminder to view and edit the reminder schedule for timesheet notifications. You can set the time and choose which days to be reminded. When you receive the notification, you can tap to access the app and enter time.
In this section, you can do the following:
tap Timesheet Update Emails and Leave Request Update Emails on or off.